The Ultimate Guide on How to Contour Your Face

Whether you’re an avid makeup-wearer or not, having certain tricks up your sleeve for when the occasion calls for it can be helpful. One makeup trick in particular is how to contour. We’re not saying you need to do it daily–but you totally can if you want! There are ways to subtly contour for a day look that’ll give you a little more definition or really dial it up to get a snatched, chiseled look for a special event. Read on for Maybelline New York’s top tips for contouring– it’s way easier than you might think and only requires a few products!

What is Contouring?

Contouring is a makeup technique that has been used by makeup artists for decades to add definition and dimension to the face. Similar to the art of shading with darker colors to create a shadow, to contour your face, apply darker makeup shades in areas that you want to sculpt such as under the cheekbones and jawline, and lighter shades where you want to pop or highlight like the top of the cheekbones and nose. To put it simply, contouring is a way to enhance your natural features with makeup by manipulating the way that light hits your face (and body– you can contour everything from your décolleté to your abs, and even your legs, too!).

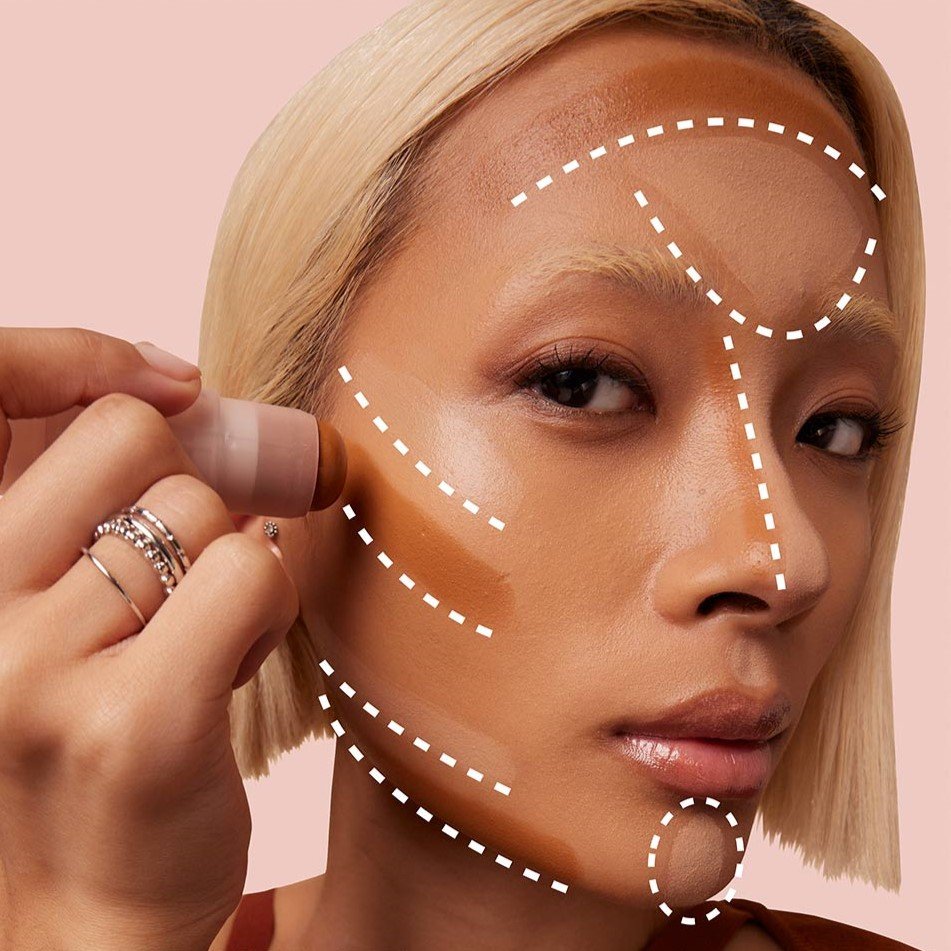
How to Contour & Where to Put Contour

As mentioned, you’ll want to apply your dark contour products in areas that you want to create shadows. Typically, that means right under your cheekbones, along your forehead and jawline, and on the sides of your nose are common areas to apply contour to give the appearance of more sculpted bone structure. Depending on where you place your contour, you have the ability to slim, which is usually the case when contouring the nose, or lift, which is what shading the cheekbones and jawline will accomplish.

Step 1: Choose Your Contour Product

What Contour Product Should You Use?

There are several different types of contour products that will help you achieve your desired outcome. From cream and powder to liquid contour formulas, you can choose whichever one is best suited for your skin type and the contour look that you’re going for. No matter which formula you choose, the areas that you apply your contour will remain mostly the same.
Powder Contour 101
If you’re new to contouring, a powder formula like City Bronzer® Powder Bronzer & Contour is usually the most forgiving because it’s not as pigmented as a cream or liquid, so you don’t have to worry as much about blending. Another reason you might want to opt for a powder contour formula over cream or liquid is if you have oily skin– a powder will help to absorb some of the excess oil, leaving you with a matte finish.
  • City Bronzer® Bronzer & Contour Powder Makeup
    Deep
    Buy now
Cream Contour 101
If you have dry skin, prefer a dewy look, or simply like the feel of cream formulas, you’re going to love our new Lifter Stix™ Multi-Use Face Stick! It’s another beginner-friendly contour product because the stick design allows you to precisely sculpt with just a swipe. Then, you can use your fingers, a damp makeup sponge or an angled makeup brush to buff it into your skin. Cream formulas will naturally adhere to your skin, so for the most natural look, we recommend using your fingers, as the extra heat will help to melt the formula. The result: the most believable chiseled contour! And Lifter Stix are available in an impressive 18 shades, which is not the norm for contour products, so it allows you to get a customized, yet realistic look for your unique skin tone.
  • New
    LIFTER STIX™ Multi-Use Face Stick
    65
    Buy now
Liquid Contour 101
For the contour lovers who have already tried their hand at powder and cream formulas, we invite you to level up and try a liquid contour like our Instant Age Rewind® Eraser Multi-Use Concealer, which doubles as a concealer and contour product. Simply choose a concealer shade (or two) darker than your foundation and this moisturizing, crease-resistant formula will impart the perfect natural contour. It’s easy-to-use, targeted sponge applicator will hug the natural contours of your face and dispense product right where you want it. Similar to cream contour, you can use your fingers, a damp makeup sponge, or a brush to blend. A sponge is nice for sheering out the formula a bit for more of a diffused wash of color rather than a strong contour. If you prefer the latter, stick with an angled brush.
  • Instant Age Rewind® Eraser Multi-Use Concealer
    122
    Buy now

Step 2: Prep Your Base; Wash Your Face

Starting with a clean canvas is always the way to go. It will ensure that you get the smoothest application and that your contour blends seamlessly onto your skin.

Step 3: Use Primer and Foundation

If using a primer isn’t already part of your routine, we highly advise you add one, especially if you’re doing a full makeup beat that includes contouring. A primer will help to grip your makeup and keep it in place all day, so that all of your hard work doesn’t disappear. Then, follow that up with your foundation of choice. For a more natural finish, try a skin tint, but for a true matte foundation with a lightweight and luminous finish, go for our Super Stay® Lumi-Matte Foundation.

Step 4: Contour Your Forehead

With whatever contour product you opted for, start by applying it to your forehead. We recommend starting at the temples and into the hairline, blending inwards toward the middle of your forehead. The reason you don’t start in the middle of your forehead is because you want to create a shadow by the temples and hairline. You always want to first apply to the area of your face that you want darkest, specifically a spot where natural shadows would be. That way, as you buff the formula out, you’re left with the most realistic shaded contour look.

Step 5: Contour Your Jaw & Cheekbones

If you’re using a cream or liquid, dab a few dots of product right under your cheekbones and along your jawline, then blend. Start with less product, you can always add more as you go. As you blend with your brush or another tool, you can also connect the areas of contour from your forehead down your cheeks and along your jaw in backwards “3” shapes. This will guarantee a seamless, cohesive look. If you’re using a powder, the areas of application will be the same, you’ll just have to swirl your brush in the compact to pick up your formula first, and then buff it into your skin along your cheekbones and jawline.

Optional Step 6: Contour Your Nose

To contour your nose, you have a few options of where you place your product. You can apply your contour down each side to give the bridge a slimmer look, or you can apply your contour right at the tip to make your nose look more upturned and button-like. It’s all about having fun, experimenting, and personal preference!

Step 7: Blend Blend Blend

No matter where you applied your contour, make sure that you’re blending sufficiently with your fingers, sponge, or brush. No zebra stripes, here!

Step 8: Add Color & Glow

A contoured makeup look looks best when worn with blush, bronzer, and highlighter. Following the idea of coloring by number, you’ll want to highlight the areas that you want to “pop”, so the inner corner of your eyes, on your brow bones, the tip of your nose, on the tippy tops of your cheekbones (right above where your blush will go), the middle of your forehead and your Cupid’s bow if you’re feeling really *sparkly*. Your bronzer and contour can overlap a little, but the idea of bronzer is to impart a sunkissed effect, whereas contour is about accentuating the your bone structure with shadows. We recommend taking a fluffy bronzer brush and swirling product along your forehead, cheeks, nose, and chin, where the sun would naturally hit. If you’re using a liquid bronzer like Sunkisser, dot the product in the same bronzer designated spots and follow that up with a big fluffy brush to blend it out. Blush can go right on the apples of your cheeks and up your cheekbones– some pink or peachy color will help to balance out your contour.

Step 9: Spritz on that Setting Spray

To keep your look locked in all day, finish with a spritz of setting spray in a “z” shape– this will help you get every bit of your face.

How to Contour Your Face Shape

Depending on whether your face is more round, oval, or square, there's a right way to contour so you max out of the look. Read on for Maybelline’s pro tips on the two techniques and upgrade your makeup application skills in no time.

How to Contour Round Face Shape

If your face is round and softer, you want to contour in a circular formation around the forehead. Suck in your cheeks to find your contour point and sculpt below your cheekbones which is going to lift your cheeks and give your face dimension.

How to Contour Oval Face Shape

If your face is oval or longer, you may want to focus your contour on your forehead, more on the top and less on the temples. Contour your lower chin line to create a shadow and soften the point.

How to Contour Square Face Shape

If your face is more square and structured, you want to contour at the high temples and forehead and work your way inward. Go softer on the cheek contour. It's about softening: You want to prevent making your face appear too structured or hard!

How to Contour Heart Shaped Face

Because a heart-shaped face tends to have a smaller jaw and pointier chin, you’ll want to balance out the broader appearance of the forehead by contouring more on the sides of your forehead. Focus more on the temples rather than the middle of the forehead. Heart-shaped faces usually have prominent cheekbones already, so you don’t necessarily have to contour much, there, but rather play up your cheeks with some blush.

How to Contour Diamond Face Shape

Diamond-shaped faces are longer in length than they are in width, with the cheekbones being the widest part of the face and most prominent. Because of this, focus your contour on softening the cheekbones by applying your contour diagonally from the top of your ear, right under your cheeks and blend up towards your hairline rather than bringing the shadow down closer to your mouth.

Face Contour FAQs

Whether you contour before or after your foundation is up to your personal preference, but there are reasons why you might prefer one way over the other. If you apply your contour before your foundation, – a technique that makeup artists call underpainting– you will get a much more subtle contour. This can be a great option for someone who wants the most natural looking contour, as it will appear like the shadows are more realistic rather than created by makeup. The downside is you have to be extremely careful with your application and blending because if you put too much foundation over top or are overzealous with your blending, you’ll essentially erase your contour. If you don’t want to deal with that challenge or prefer a bolder, more striking contour, it is advised that you apply your contour after your foundation. Your contour should be darker than your foundation, as it is meant to mimic the look of a shadow. You want there to be a clear distinction between your foundation and contour shades, which is why one to two shades darker than your foundation is usually the sweet spot for your contour color. To choose a contour shade, you want it to be darker than your foundation, but you also have to consider undertones. For the most part, your contour color should be cool in tone, unlike your bronzer shade, which should be warm– this is regardless of what your own undertone is. The reasoning: shadows have more of a taupe or gray appearance vs. brown or orange. The best way to blend out your contour will depend on the contour product that you’re working with. Preference comes into play here, too. For a powder contour, a brush is usually the best option, while creams and liquids tend to pair well with a makeup sponge to sheer them out and diffuse the color a bit (but you could use your fingers or a brush, too). Typically, your fingers will give a more seamless, subtle look while a brush will give you a stronger pigment load for a more noticeable contour. Highlighting is a standard practice across any face shape. The art of highlighting is to bring areas forward. You want to highlight the area under the eyes and downward, your chin area, down the bridge of the nose, under the brow bone and in the center of the forehead starting between the brows.

Shop Contour Makeup