


18 Tips on How to Apply Concealer Properly
To put it simply, concealer punches way above its weight class. Inside its tiny tube lives a highly concentrated pigment that wields the power of a magic wand, allowing you to simply apply concealer to nix dark under eye circles, cover up blemishes, and even out your skin tone with just a few swipes. But that’s not all. Depending on your needs and skin concerns, there are specially formulated concealers that will counteract discoloration, brighten, and more. It sounds too good to be true, we know, but we promise you it’s not. Ready to get to the application process? Read on for some helpful concealer tips including where to put concealer, how to blend concealer, and more.
Tip #1: Prep Your Skin with Primer
Before we can get to the actual concealer part, it’s important that your skin is in good shape, ensuring that the makeup you put over top will look its best and last all day. After completing your skincare routine, go in with a primer like FaceStudio Master Prime, which offers several different formulas depending on your skin type such as hydrate + smooth for dry skin or blur + pore minimize for oily.
-
Facestudio Master Prime Primer Makeup Hydrate + SmoothBuy now -
Fit Me® Matte + Poreless Primer Mattifying Face Primer ClearBuy now -
Baby Skin® Instant Pore Eraser® ClearBuy now


Tip #2: Apply Foundation First Before Concealer
When it comes to applying concealer and foundation, a good rule of thumb is to apply your foundation first, followed by concealer. When you apply concealer first, you run the risk of removing or messing with it when you sweep on your foundation or powder. When you start with foundation, it helps to even everything out so that you might not need much concealer.
Tip #3: How To Blend Concealer
Because you want your foundation to sit and stay where you apply it, it would be counterintuitive to rub it around. Instead, it helps to tap gently with a soft stippling motion. And this goes for whether you use a brush, a sponge, or even your finger– a gentle dabbing motion will allow your concealer to blend into your skin seamlessly. Then, for even more staying power, dab a powder over top.
Tip #4: Apply Light Layers
Depending on how much coverage you need in a specific area and how pigmented your concealer is, it may be necessary to layer it on. In that case, you’ll want to go in with a light hand rather than globbing it on. Less is more– by adding on bit by bit and gently tapping each layer into your skin, you’ll achieve a more natural-looking appearance.
Tip #5: Choose the Right Concealer Formula for the Job
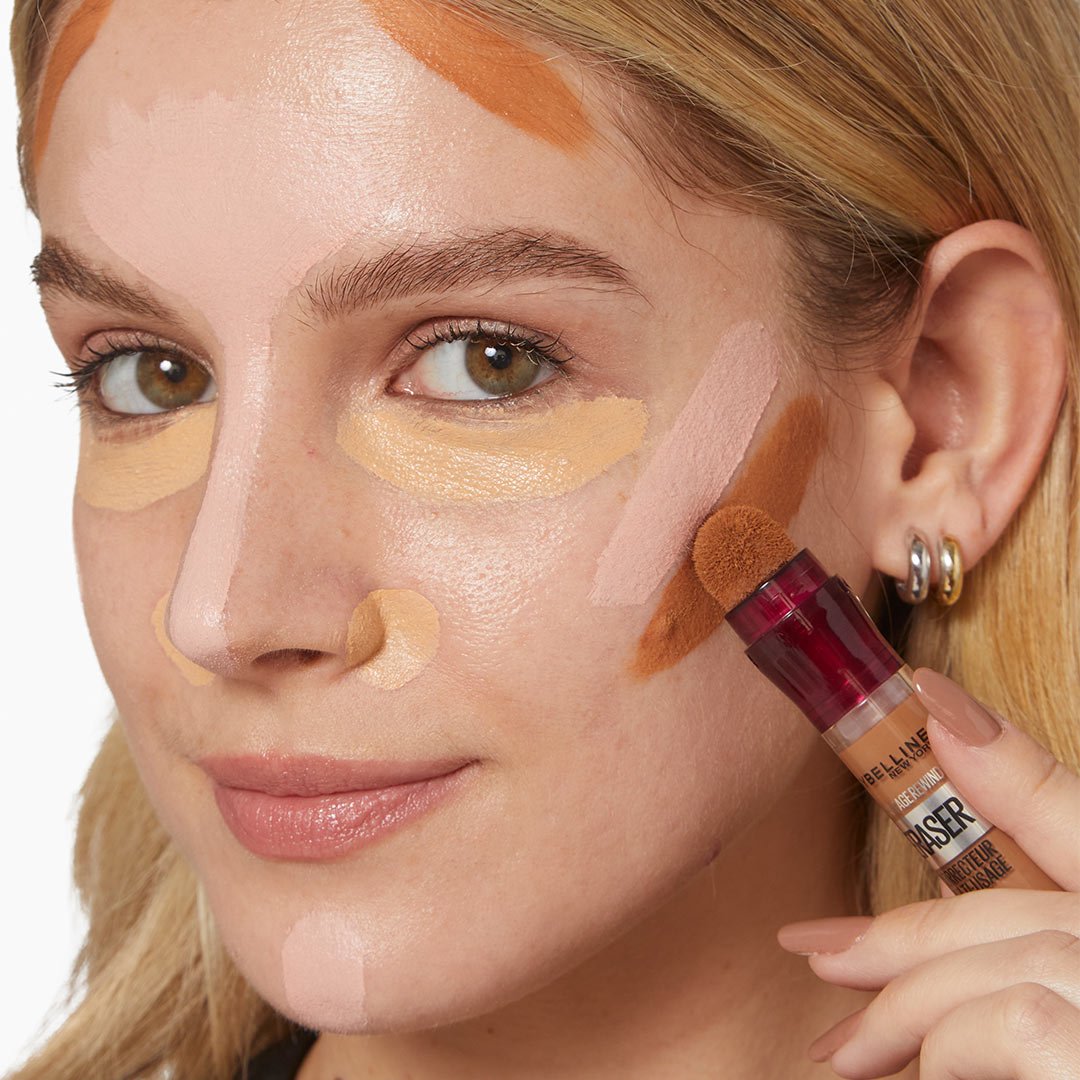
If you’re looking to apply under eye concealer, chances are you’re going to want something that doesn’t feel cakey and won’t crease. But, if you’re going to a special event in the summer where humidity may be a factor, it would be most important to worry about something that promotes longevity. In each instance, it’s important to consider which formula will work best. Instant Age Rewind Eraser is a great choice for several needs including disguising under eye circles, highlighting, and even contouring (depending on the shade you use) because it’s moisturizing and crease-resistant and it has a sponge tip applicator that’s easy to dab in a targeted spot. If your primary concern is finding something that will withstand tears, rain, and more for up to 30 hours, then Super Stay Active Wear Long-Lasting Concealer is the formula for you.
-
Instant Age Rewind® Eraser Multi-Use Concealer 122Buy now -
Fit Me® Concealer Face Makeup LightBuy now -
Super Stay® Longwear Liquid Concealer Up To 30Hr Wear 30Buy now


Tip #6: Hydrate Dry Skin With Concealer
Knowing your skin type will make all the difference in choosing the right concealer. For instance, if you have dry skin, you might not want to use something that promises a matte finish. Instead, choose a concealer with a hydrating, ultra-blendable formula like Instant Age Rewind Eraser. Its sponge applicator allows for easy application in the dry, under eye area and its creamy formula creates a more radiant appearance. Dab directly onto skin and blend in an outward motion.
Tip #7: Smooth Mature Skin With Concealer
Makeup has a way of settling into fine lines and accentuating the wrinkles of mature skin, which is why a lightweight, breathable formula is key. Enter: Super Stay Active Wear Long-Lasting Concealer. It won’t crease, feel cakey, or settle into fine lines. Apply a thin layer to skin using the comfort-curve flex applicator, then blend with your finger to help melt the formula seamlessly into your skin.
Tip #8: Lift Your Eyes With Two Concealer Shades
It may sound silly to use two concealer shades, but doing so can actually have an incredible effect, especially in the under eye area. Go for one shade lighter than your skin tone and one shade darker. Use the lighter shade in areas that you want a brightening pop such as under the eyes and along the brow bone. Then, apply the deeper shade under the lighter shade and up toward your hairline. Use a damp sponge to blend the two but still have a contrasting appearance that draws eyes up and out for the ultimate sculpted and lifted look.
Tip #9 How To Apply Under Eye Concealer
If you’re trying to combat dark circles, a lighter, brighter light-reflecting concealer is key. The Instant Age Rewind Eraser Brightener is specially formulated with brightening pigments to illuminate the entire eye area, but most importantly, will still look natural. Like 8 hours of sleep in a tube!
Tip #10: Create A Flawless Under Eye With Concealer
One place where your concealer application technique is key is under the eyes because you don’t want it to crease or smudge. Plus, if you’re trying to conceal darkness and smooth out your under eyes, there’s no room for error. Pro tip: use your fourth finger to apply– it’s the weakest so it’s not going to tug on the delicate area, which can exacerbate wrinkles. Bonus: the heat from your finger will warm up the concealer formula so that it melts into the skin effortlessly. If you're oil-prone, try blotting the area gently with a tissue after applying your concealer and letting it dry. This will help to prevent it from creasing and settling into fine lines.
Tip #11: Mix Shades With BB Cream
We’re going to let you in on a little secret– playing chemist with your concealer will allow you to create the most perfect coverage for you and your concerns. Uneven texture can be one of the toughest things to conceal, especially because it often requires more than one concealer shade to get your base just right. To keep the difference in shades from being noticeable, it can help to blend the two concealer shades with a lightweight bb cream such as Dream BB Pure and a sponge to create a seamless-looking finish. Light and hydrating, bb cream serves as the perfect "bridge" between the two shades, so you don't have any noticeable lines of demarcation, but you get more coverage thanks to the introduction of concealer into the mix.
Tip #12: Apply A Darker Shade For Blemishes
Although it may seem like a good idea to use a lighter shade on a blemish– especially one that’s dark or discolored– in order to make it disappear, the opposite is true. In fact, using a lighter shade will just call attention to the area, quite literally “highlighting” it. Instead, you’re going to want to use a full coverage concealer like Fit Me Concealer in a shade darker than your skin tone and dot it directly on the raised, red or discolored area only– not the skin around it. Then very gently, pat until it blends into skin. After the actual blemish is covered, use a lighter shade or one that matches your skin tone better to blend the darker shade into the rest of your skin.
Tip #13: Use A Yellow-Based Concealer To Color Correct Darkness
Color correcting with a dab of contrasting color concealer is a great way to help fix a range of skin tone concerns. Combat dark circles and other darkened areas (think: leftover discoloration from a breakout) with a do-it-all concealer like Instant Age Rewind Eraser Neutralizer. It has yellow undertones to balance out purples and darker tones. Then, you can apply your regular concealer on top.
Tip #14: Use A Green-Based Color Corrector On Redness
If you suffer from rosacea or general redness around the nose or on the chin (the most common areas for redness), a green color corrector like the Master Camo Color Correcting Pen will help to neutralize the ruddiness and prepare the skin for concealer over top.
-
Master Camo Color Correcting Pen Green For Redness - all skin tonesBuy now

Tip #15: Use A Darker Shade Of Concealer To Contour
Once you find a concealer formula that you love, it’s smart to get it in a few shades. Grab a shade or two darker to use it as your contour and apply it under your cheekbones, on the sides of your nose and along the jawline for a more chiseled look. We love the Instant Age Rewind for this because the sponge applicator makes for a natural finish and easy application in the areas you want to sculpt.
Tip #16: Use A Lighter Shade Of Concealer To Highlight
In the same way that a darker concealer shade can work as a contour product, a lighter shade can double as a shimmer-free highlighter. Use it on the areas that you want to pop like the tops of the cheekbones and down the center of the nose. This makes for a great base ahead of applying your traditional highlighter, too, because it creates more of a contrast, allowing your shimmer shade to really shine.
Tip #17: Use Concealer As An Eye Shadow Primer
If you really want your eye shadow to pop, especially if you’re using a more vibrant color or one with lots of sparkle, it’ll look best when applied on a brightened canvas. That’s where concealer comes in. Use the same shade as the one you used on your under eyes and it’ll create a nice, bright base that not only helps your shadow to pop, but it will grip it better too, especially on oily lids. And this works for everyday, neutral looks as well–simply dab some leftover concealer onto your eyes to even out discoloration and promote longevity.
Tip #18: Set And Bake Concealer With Setting Powder
Wondering how to set concealer? A loose setting powder like the Fit Me Loose Finishing Powder is about to become your concealer’s best friend. Dust it on over the areas that you’ve concealed to lock in your look. It will help keep your concealer in place and prevent it from creasing, sliding or disappearing altogether. For even more insurance, finish with a spritz of a setting spray like FaceStudio Lasting Fix over the top.
Share all the ways you are using Maybelline concealer with us on social and tag @maybelline with your favorite concealer tip.


